
The first real project I decided to get into was replacing the trunk floor. It was in really rough shape, all corroded out from the generations of rodents living in the convertible well and trunk drops. This picture doesn't do it justice. Much of the damage is hidden because somebody at some point filled a lot of it in with Bondo and then covered the whole thing in truck bed liner. It was completely rusted through over both supports. Fortunately, replacements are readily available. I ordered one from an online outfit called Adeal's. It looks like they're all the same, but Adeal's had the lowest shipping. Anyway, I ordered the full floor kit. It comes as a complete kit with a floor, braces and fuel tank straps. All you have to do is cut the old floor out and weld in the new one. What could be easier?
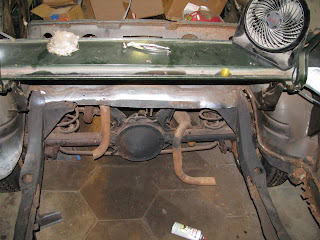
So I set about cutting the floor out. After a little time with a Sawzall, a cut off tool, an angle grinder, a sheet metal nibbler, and a spot weld cutter, I finally got the floor out and the braces underneath removed. The best tools by far for cutting out the floor are the angle grinder and the spot weld cutter. While I was at it, I went ahead and cut off the old exhaust pipes. They were so rusted out that they turned to powder as soon as I hit them with the Sawzall. I salvaged the chrome trumpet tips, though. Oddly enough, they're in halfway decent shape, and I think they're salvageable. The chrome even looks pretty good. Here's a picture of a trunk with no floor. Also a decent shot of the posi. You can see in the lower right of the picture the results of a very poor repair work to the passenger side quarter and drop. I knew it was there, but I hadn't gotten a real good look at it until this point.
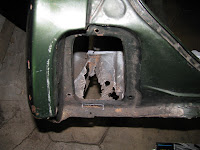
 Here's a picture of the area. It's a little hard to see, but in addition to the obvious rust problem, there's a line of sheet metal screws sticking through the quarter. I guess some previous owner flanged the existing quarter, and screwed in a patch. The "new" drop was just a piece of sheet metal, folded over the existing drop and riveted to the trunk floor. Needless to say, that has to go. I did a little looking around and found a company that reproduces that trunk drop piece. Mill Supply. Pretty interesting website. I may have to order some pieces for my truck too, at some point. As long as I'm at it, there are other areas that are going to need replacing that aren't covered by the trunk floor. Both tail light have areas right behind them where the rust has gone all the way through the trunk floor. Also, and I don't know what you call the area, but forward of the trunk along the wheel housing was also rusted through, so I'll need to patch that on both sides as well. Unfortunately, I haven't found a source for those pieces, so for now, the trunk floor is out, and the next step is fabricating and welding in patches.


